With the axles back in place, I now had a rolling chassis. Although the exhaust is fitted from underneath the vehicle, I thought it would be easier to install it now, before refitting the rear tub. The old rusty mild steel exhaust had long since been discarded, and I had decided to replace it with a stainless steel one. These are supposed to last for a much longer time than the original mild steel variants.
Of course stainless is more expensive, but if it lasts longer than two mild steel exhausts it will be a cheaper option in the long run. I also decided to go for stainless tubular manifolds. These apparently allow a better gas flow, and increase performance slightly. Having done some research, I settled for a complete sports exhaust system from Rimmer Bros. I had originally considered a Janspeed exhaust, but by this stage in the rebuild, finances were becoming a bit tight, and the Rimmer Bros exhaust was slightly cheaper. I had previously fitted a custom stainless exhaust to my ST1100, so I was eagerly looking forward to seeing what the quality of the Land Rover stainless steel exhaust would be like.
A courier duly turned up with a large box containing all the necessary parts. One of the first things I did was the magnet test. If you have good quality stainless steel, a magnet should not stick to it. Unfortunately with the Rimmer Bros exhaust, it did. I then received an email survey asking me to rate my experiences of Rimmer Bros, so one of the things I mentioned on the survey was my disappointment at the grade of stainless steel used. A few days later I received an email from Rimmer Bros which, to some extent, allayed this disappointment. It read as follows:
“I wanted to reassure you about the different grades of stainless steel we utilise in our exhausts and also our lifetime warranty.
The exhausts that we supply are all made from high quality Stainless Steel which is a generic term for a group of corrosion-resistant steels containing a minimum of 10.5% chromium. Due to the inclusion of ferrous metals to improve the malleability of the components a magnet will be attracted to the material.
The exact material spec used are as follows :
Exhaust Pipes 18/16 swg 1.2/1.5mm S/S T.304/409 self colour,
Silencer Bodies 20 swg 0.9mm S/S T.304 polished,
Baffles 18 swg 1.2mm S/S T.304 self colour,
Perforated Tubes 18 swg 1.2mm S/S T.304/409 self colour,
Brackets etc 14/18 swg 2.0/1.2mm S/S T.304 self colour,
Acoustic Packing - Glass Fibre.
Many years experience of supplying Stainless Steel exhausts leads us to be proud of the quality and reliability that these systems offer.”
They then went on to point out that under their Lifetime Warranty, the exhaust system was guaranteed for the lifetime of the vehicle, and added:
“It should be noted that it is quite normal for discolouration to occur on external surfaces after a few months of use. This can be removed with wire wool if required and will not affect the guarantee. This guarantee does not apply to catalysts or to vehicles converted to run on LPG fuel.”
So we'll see how it goes.
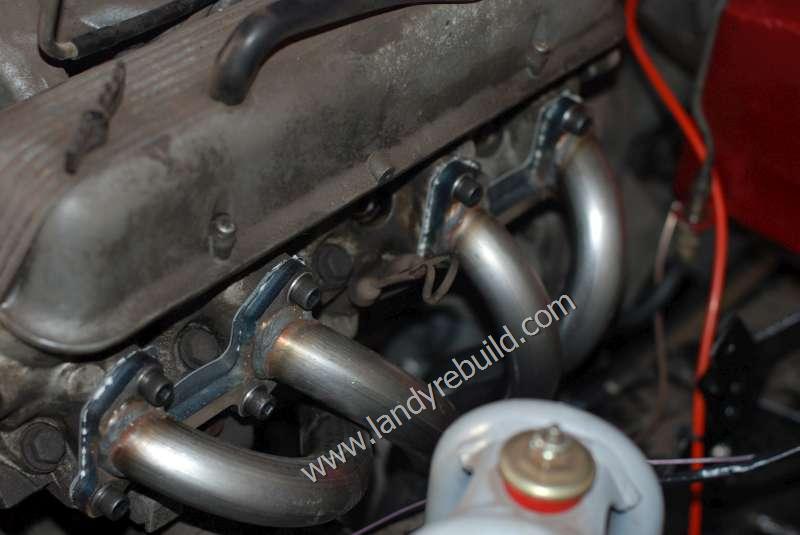
The installation instructions included with the exhaust were obviously geared to replacing an exhaust on a completed vehicle, so instead of following the sequence given, I just started at the front and worked my way backwards. The manifolds were installed first, but just loosely, to check the fit. I found that on the passenger side manifold the strengthening bar connecting the headers was fouling the dipstick, so I simply removed this part of the bar. That of course probably invalidated the guarantee, but I didn't particularly want to modify the dipstick housing! Once I was happy with the layout, and that the lower end of the manifold pipe was in the correct position, the manifolds were then fully installed using a tube of Holts Firegum Exhaust Paste.
Then using the same technique of dry fitting, I installed the centre sections of the exhaust, and loosely fitted the exhaust hangers. Once happy with the fit, I again used the Holts Firegum paste - apart from providing a gas-tight seal when it dries, it also helps to lubricate the sections of exhaust pipe when you're fitting them. It's messy stuff though, so have a rag handy to wipe your hands!
I then installed the rear section including the silencer. There's no centre box on the sports exhaust; and this is one of the reasons I chose this type - there's a much better-sounding "burble" from the V8!
With everything correctly located, I then went over the exhaust again, tightening the hanger bolts and ensuring it wouldn't knock against any part of the chassis or bodywork.
Comments
Have your say about what you just read! Leave a comment in the box below.
(Your email will not be displayed)
NOTE: All comments are moderated, so will not appear immediately.