I was already the proud owner of a Garmin GPSMap 276C, which had proved extremely useful. I had already devised a system of connecting it to my ST1100's electrics; now I needed to work out some way of mounting it in the Land Rover, powering it using the vehicle's battery, and connecting the audio channel to the vehicle's speakers.
I considered getting some sort of windscreen mount, but this older unit is quite heavy, so I didn't think any suction-cup type attachment would be any good - especially on a bumpy offroading trip! Other type of mounts attach to the rear-view mirror, but when I tried out the GPS in this position I just didn't like it. Mounting it in the centre of the upper dashboard shelf (where later models have an ashtray) meant that the windscreen got in the way of the aerial.
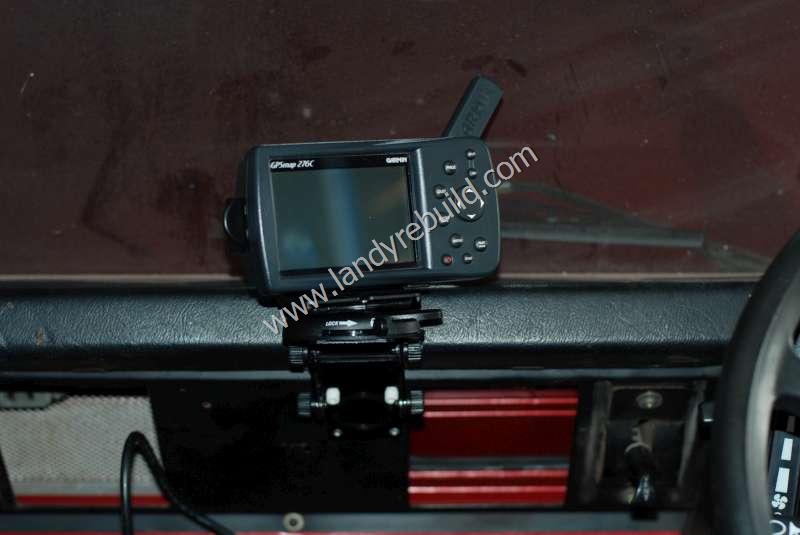
Placing it on the right-hand side of the dashboard shelf between the steering wheel and doorframe could have worked, but obstructed part of my view of the road ahead. The only location I liked was in the centre of the upper dashboard shelf, but on the edge away from the windscreen. And if it could be just a fraction lower, that would be perfect.
Now, how to fix it in this position? I had already looked through the online catalogue at Ram Mounts but couldn't see anything suitable. Rummaging through a box of bits for something else I could use as a bracket, I discovered something which was possibly originally intended to be used to fix a small computer monitor to a wall.
It was double-hinged, and two knurled screws on the side of each hinge enabled the two arms of the bracket to be kept in any suitable position. I dismantled the base of the Garmin Automotive Kit cradle base and using four small screws, attached this to the upper section of this double-hinged bracket. Then I used four pop-rivets to fix the lower section of the bracket to the central steel section of the upper dashboard between the air vents.
I then turned my attention to the power supply lead which came with the Garmin Automotive Kit. The shaped end which connects to the GPS unit could obviously be left as it was, but the other end needed some modification. I simply cut the cable and separated the wires.
I connected the red wire via a 1.5A inline fuse to a permanently live supply (a brown wire from the fusebox).
The black wire is earth - this was joined to a black earth wire from the central console instrument lighting.
That took care of the power supply. In order to hear the spoken directions, I used a 3.5mm male-male stereo audio lead which I had spare. I cut the plug off one end. (The other end simply plugs into the "Aux" socket on the face of the Beat stereo head unit. I ran this audio lead through some flexible conduit, which runs from behind the fusebox, through into the lower engine bay, under the gearbox tunnel, and up into the central cubby box housing the radio).
The left and right channels from the stereo audio lead were joined and connected to the brown wire from the Garmin cable (this is the positive voice wire).
The negative (black) wire from the stereo audio lead was then connected to the orange wire from the Garmin cable (this is the negative voice wire).
The other coloured wires from the Garmin Automotive lead were not used. For reference, they are coloured yellow (Data in 1), blue (Data out 1), green (Data in 2), violet (Data out 2), and white (Alarm).
I just used solder for the connections, as this lead will be permanently part of the vehicle. The nice thing about connecting it this way is that if the spoken directions are no longer required, I can simply unplug the Aux lead from the stereo head unit, and I then no longer hear the Garmin voice from all four speakers.
Here's the finished article: